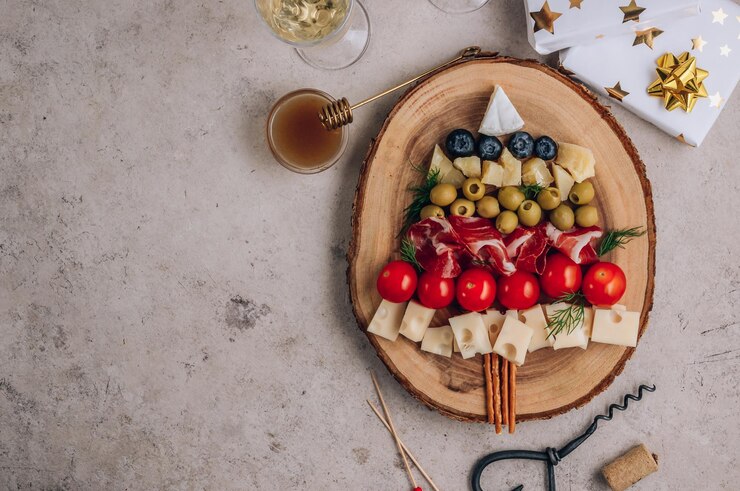
– Christmas Appetizers –
The winter holidays are upon us once again, bringing with them all the festive sights, smells and flavors we’ve come to love. As the flakes drift down and twinkle lights sparkle in the trees, folks near and far begin preparations for celebrating with friends and family. What’s a party without the perfect nibbles to enjoy while sharing laughs and stories by the fire? In this guide, we explore a bounty of bite-sized delights to lift your spirits and start the seasonal fun.
Whether you prefer warm and comforting or light and bright, there’s an appetizer here for everyone. Roasting chestnuts or baking up a batch of cranberry-rosemary scones – the scent alone will transport you straight to a snowy wonderland. And nothing pairs with eggnog better than mini quiches, stuffed mushrooms or pumpkin soup shooters for a splash of color and taste. Creative dips like spiced candied bacon spread are sure to disappear fast when paired with crunchy veggies or crackers.
For those with a sweet tooth, christmas macarons, thumbprint cookies with holly “jewels” or peppermint bark provide festive flair without skimping on flavor. Don’t forget the classics like candied oranges, cranberry-pistachio balls or mini gingerbread people – the perfect reminder of holidays past. Whichever options you choose, the merriment and cheer they bring will light up every face at your gathering.
So grab your apron, pop in some carols and get baking! With this season’s bounty of With this season’s bounty of appetizer ideas, you’re sure to kick off a magical Christmas Appetizers ideas, you’re sure to kick off a magical Christmas filled with smiles, memories and joy shared amongst loved ones
Baked Brie with Cranberry and Rosemary
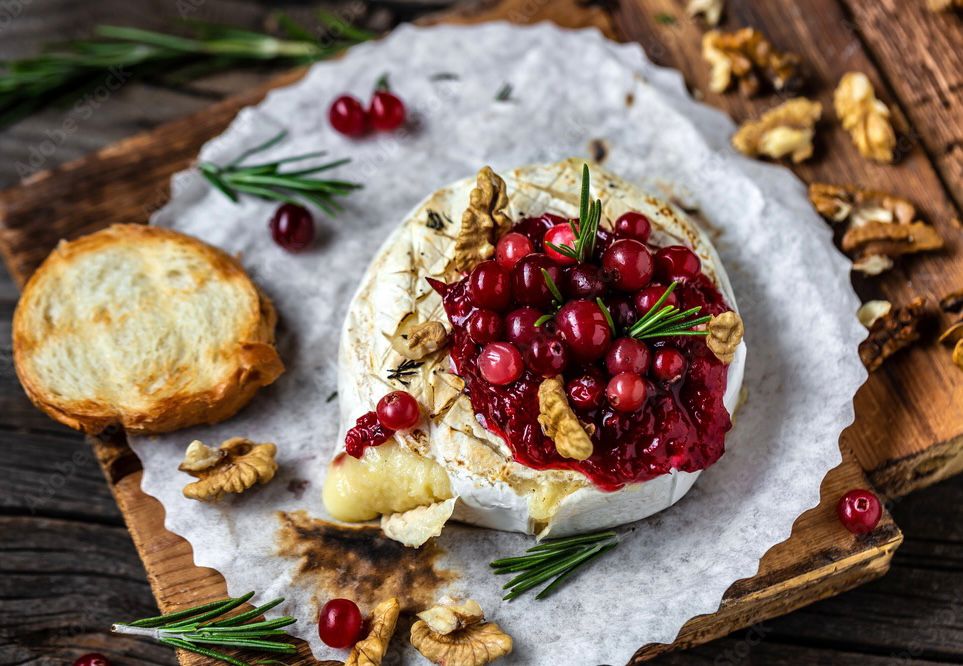
Let me tell you about one of my favorite holiday appetizers – Baked Brie with Cranberry and Rosemary. Every year when the holiday season rolls around, I get so excited to break this bad boy out for friends and family. Not only does it look gorgeous sitting there all baked and gooey, but the flavors are just to die for.

The brie cheese is the star here. You really want to use a nice ripened wheel that gets oh so creamy when baked. As for the cranberries – their bright red color just screams Christmas! I like to simmer them down with some honey or brown sugar so they pop and get jammy. Then you toss in some fresh rosemary for an herby complement.
I swear, the aromas that fill the kitchen as it bakes are enough to lure anyone in. The scent of warm brie mingling with the cranberries and rosemary is seriously mouthwatering. Once it comes out of the oven all melty and gorgeous, I just can’t wait to dig in.

That first bite is magical.
The creamy brie coats your mouth in luxury while the cranberry compote bursts with tart-sweetness. Those little hits of rosemary keep it interesting too. I like to break out some crackers or bread so you can enjoy those cheesy-fruity leftovers. It really is like an edible work of art.
This has become a tradition in my family over the years. Everyone looks forward to that first taste and reminiscing about past holidays. Even if you’re new to baking, this one is surprisingly easy. Just a few simple ingredients transform into something so impressive and delicious. I highly recommend giving it a try this season – it’s sure to be the hit of any party. Who doesn’t love brie, cranberries and rosemary all baked together in creamy, shareable bliss?!
The Ingredients:
- Brie Cheese: Brie, with its creamy interior and soft, edible rind, is the star of the show. When baked, its texture becomes even silkier, making it the perfect canvas for the other ingredients.
- Cranberries: These tiny, vibrant red berries add a burst of color and a sweet-tart contrast to the richness of the Brie. Their festive appearance is a perfect fit for the Christmas season.
- Fresh Rosemary: This aromatic herb provides an earthy, fragrant note to the dish. The combination of rosemary and cranberries creates a wonderful balance between sweet and savory.
- Sweeteners: Depending on the recipe, you may find honey, brown sugar, or maple syrup used to enhance the sweetness of the cranberry topping.
- Nuts: Some variations include toasted almonds or pecans for an added crunch and nutty depth.
- Bread or Crackers: These serve as accompaniments, providing a delightful contrast in texture to the gooey Brie.
The Preparation:
- Choosing the Right Brie: Start with a wheel of high-quality Brie. It’s crucial to use one that is ripe but not overly runny to ensure it holds its shape during baking.
- Cranberry Topping: In a saucepan, combine fresh cranberries, sweeteners (such as honey or brown sugar), and finely chopped fresh rosemary. Simmer until the cranberries burst and the mixture thickens into a luscious compote.
- Preparing the Brie: Slice off the top rind of the Brie wheel to expose the creamy interior. Place it in an ovenproof dish or Brie baker.
- Topping the Brie: Pour the cranberry compote over the Brie, allowing the flavors to meld. You can also add chopped nuts for an extra layer of flavor and crunch.
- Baking: Preheat your oven to around 350°F (175°C) and bake the Brie until it becomes soft and gooey. This typically takes around 15-20 minutes.
- Serving: Once baked, garnish your Baked Brie with fresh rosemary sprigs for a fragrant touch. Serve it hot alongside slices of baguette, crackers, or breadsticks.
Stuffed Mushrooms with Sausage and Gruyère

As the air starts to get that festive chill, my mind inevitably turns to all the warm, cozy dishes I love preparing and enjoying with friends and family. With its savory sausage filling and melty Gruyère cheese, stuffed mushrooms are definitely one of my faves. That blend of hearty meatiness and nutty, creamy cheese encapsulates everything I love about this time of year.
Once the temperatures drop and the leaves change, stuffed mushrooms seem to call my name. Maybe it’s the earthy mushroom caps providing the perfect vessel for the rich stuffing. Or the nostalgia of tziging my nana’s recipe each December. Either way, I’m always happy to break out my baking sheet and dish these lil flavor bombs.
Some history on these bites – the concept of stuffing foods goes waaaay back, like ancient Greece way back. Mushrooms just so happened to be ideal candidates with their natural nooks and crannies. Over the centuries, folks kept playing with pairings until we landed on classics like these beauties.

combo
As for what makes this combo so magically delicious, let me break it down. The mushrooms act as a slightly nutty base to hold everything together. The sausage adds robust savoriness from its aromatic blend of warm spices. And the Gruyère takes it to the next level with its creamy, barely sweet notes that melt oh so nicely. When you put it all together, it’s pure umami bliss.
Baking them up is a total breeze too. Just stuff, top with more cheese, then pop in the oven until everything is melty and divine. The whole house fills with the most irresistible aromas. Taking the first bite is pure sensory satisfaction – the textures play so nicely off each other. It’s indulgent but also soothing, if that makes sense.
No matter the occasion, these ‘shrooms are always a major crowd pleaser. Need a quick apps for game day? Sorted. Hosting a cocktail Christmas shindig? You’re set. Even a solo self-care sesh deserves these bad boys. And feel free to tweak flavors – different sausages, herbs, or melting cheeses, it’s all good in my book.
At the end of the day, stuffed mushrooms are the epitome of cozy, comforting classics. They embody all the warm fuzzies of friends, family, and festive traditions. So when those holiday cravings strike, I’ll be baking up a fresh batch and smiling from ear to ear with each scrumptious bite. Cheers to new memories and tasty traditions!
The Ingredients:
- 24 large button mushrooms, stems removed and reserved
- 1/2 pound of ground sausage
- 1/2 cup grated Gruyère cheese
- 2 cloves of garlic, minced
- 2 tablespoons chopped fresh parsley
- 1/4 cup breadcrumbs
- Salt and pepper to taste
- Olive oil for brushing
The Preparation:
- Preheat your oven to 350°F (175°C).
- Clean the mushroom caps with a damp cloth and remove the stems. Finely chop the mushroom stems.
- In a skillet, cook the sausage over medium heat until browned, breaking it into small pieces as it cooks. Remove any excess fat.
- In the same skillet, add the chopped mushroom stems and garlic. Sauté until the mushrooms are tender.
- Stir in the breadcrumbs and cook for a few more minutes to absorb any excess moisture.
- Remove the skillet from heat and add half of the grated Gruyère cheese and chopped parsley. Mix until well combined.
- Season the mushroom caps with salt and pepper and lightly brush them with olive oil.
- Stuff each mushroom cap with the sausage mixture, pressing down gently to ensure they are filled.
- Arrange the stuffed mushrooms on a baking sheet and sprinkle the remaining Gruyère cheese over the tops.
- Bake for approximately 20 minutes, or until the mushrooms are tender and the cheese is golden and bubbly.
Cranberry and Goat Cheese Crostini
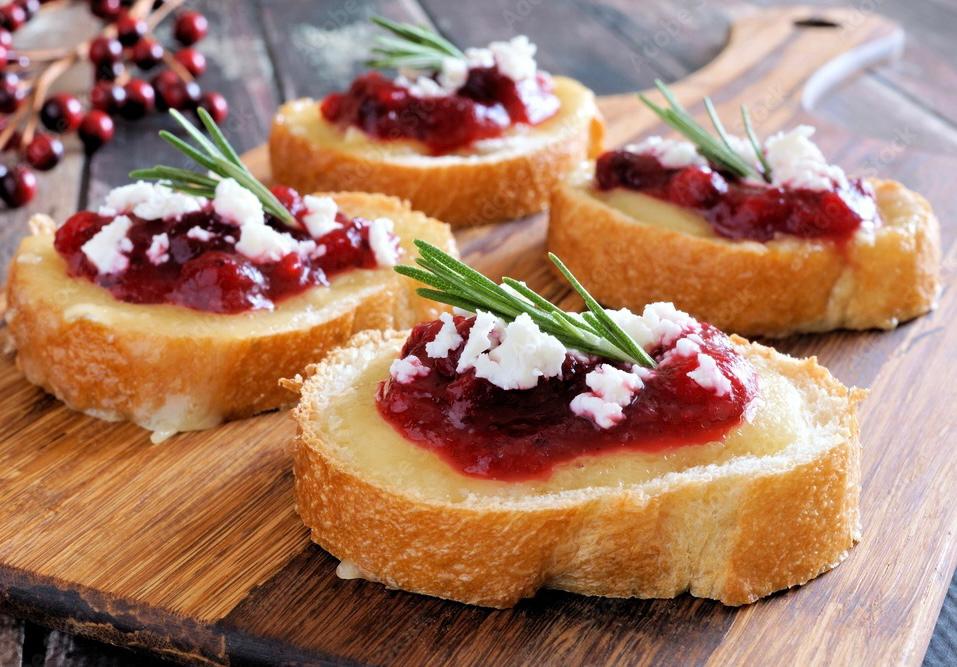
The holidays are all about friends, family, festive feasts—and let’s be real, indulging a bit too! One of my favorite parts of celebrating this wonderful time of year is sharing tasty bites and sips with loved ones. And one appetizer always steals the show at our gatherings: Cranberry and Goat Cheese Crostini.
Now, I know what you’re thinking—cranberry goat cheese toasts sound pretty basic. But trust me when I say this combo is magic in a small package. The salty-sweet-tart blend just sings in your mouth with every bite. The creamy cheese is like velvet against the burst of bright cranberry flavor. Together they lift each other to new heights.
Goat cheese deserves its reputation as one lush ingredient. Smooth and creamy but with pleasant tang, it’s so versatile. Here, it acts as the foundation, letting its luscious personality really shine through. The cranberries are truly stellar stars too. Their tart pop adds moments of joy, while slow-cooking them into a jammy compote brings out even more depth.
crispy crostini
And don’t get me started on those little crispy crostini—they may seem like a simple delivery system but they give so much. Toasted to golden brown perfection, their crunch and subtle char notes provide the perfect contrasting texture. Plus that great earthy bread aroma? Heavenly.
Visually, this dish is a total showstopper as well. That gorgeous red compote against the pearl white cheese over crisp golden bread—it just screams “holiday!” From across the room, guests will be drawn in and asking for samples. Trust me, this one is guaranteed to be the talk of any party.
Best of all, this beauty is a total cinch to pull off. No need for culinary expertise—just some basic pan toasting and mixing. In no time you’ll have an insanely impressive appetizer worthy of any celebration. And the presentation couldn’t be easier. Garnish with a fresh sprig and voila! Crown yourself party hero.
Whether for a swanky soirée or cozy movie night, these crostini are always a hit. Their balanced blend of flavors and visual “wow” factor makes them suitable for any holiday festivity. So join me in adding a bit of taste bud magic to your season with this Cranberry and Goat Cheese Crostini recipe!
The Ingredients:
- Baguette or French bread
- Fresh goat cheese
- Fresh or frozen cranberries
- Sugar
- Fresh rosemary
The Preparation:
- Cranberry Compote:
- In a saucepan, combine cranberries and sugar over low heat.
- Stir until the cranberries burst and the mixture thickens.
- Add finely chopped fresh rosemary for a festive twist.
- Crostini:
- Slice the baguette into thin rounds.
- Toast the slices until they are golden and crispy.
- Assemble:
- Spread a generous layer of goat cheese on each crostini.
- Top with a spoonful of the cranberry compote.
- Garnish:
- For an extra touch of elegance, garnish with a sprig of fresh rosemary.
Mini Caprese Skewers
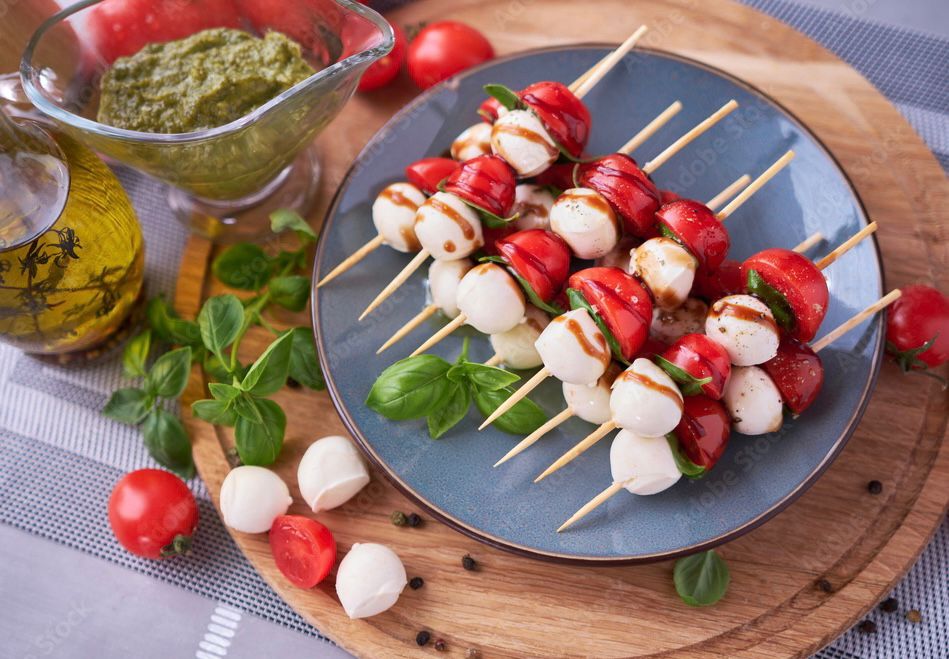
When my thoughts turn to food, I find myself dreaming up tasty dishes to share with friends and family. Appetizers are key for any gathering – you want something easy but impressive to get the party started. Over the years, one bite-sized appetizer has stood the test of time in my book – Mini Caprese Skewers.
If you’ve never had a Caprese Skewer before, picture this – the vibrant colors of fresh mozzarella, ripe tomatoes, and dark green basil all threaded together on a toothpick. It’s basically taking the classic flavors of a Caprese salad and making them portable. The best part? These skewers are so easy to make yet look like you spent all day in the kitchen.

The beloved Caprese salad actually has roots on the gorgeous island of Capri off the coast of Italy. Legend has it the combination of red, white and green ingredients was created to represent the Italian flag. Talk about patriotic snacking! Ever since, this simple salad featuring mozzarella, tomatoes and basil has been a staple of Italian cuisine.
Caprese Skewers
So why are Caprese Skewers the perfect party appetizer in my book? For starters, they’re bite-sized, which we all know makes snacks fly off the plate faster. Guests can easily grab one without committing to a whole meal. Plus, the vibrant colors of the tomatoes, mozzarella and basil against the dark wood skewers makes the whole platter visually appealing. I always get compliments when I serve these, even from self-proclaimed “picky eaters”.
Another bonus is you can get creative with your skewer toppings. While the classic combo is a crowd-pleaser, I like to add extras like pepperoncini, roasted red peppers or thinly sliced prosciutto. Get fancy with fancy cheeses like burrata too. The skewers stay fresh for a while too, so you can pre-make a big batch and not stress on party day.
Whether I’m hosting an intimate dinner party or casual backyard barbecue, Mini Caprese Skewers always make the cut. They’re the perfect balance of beautiful, delicious and easy – truly the most impressive “no-brainer” appetizer around. So this holiday season, put those skewers to good use! Celebrate Italian flavors and the joy of simplicity. Bon appetito!
The Ingredients:
- Mozzarella: The heart of a Caprese skewer, fresh mozzarella provides a creamy, mild base that complements the other ingredients perfectly. Seek out the freshest mozzarella you can find, whether it’s the traditional buffalo mozzarella or the more readily available cow’s milk variety.
- Tomatoes: Ripe, red tomatoes are the star of the show. Opt for vine-ripened tomatoes for the best flavor and appearance. Cherry or grape tomatoes work exceptionally well for skewers due to their small size and sweet taste.
- Basil: Fragrant and aromatic, basil leaves lend an essential herbal note to the skewers. Choose the largest, freshest leaves you can find, as they will be the foundation of the visual appeal.
- Balsamic Glaze: A drizzle of balsamic glaze adds a tangy and slightly sweet dimension to the skewers. The reduction of balsamic vinegar creates a syrupy consistency that not only enhances the flavor but also serves as an artistic finishing touch.
The Preparation:
- Preparation: Begin by washing and drying your tomatoes and basil leaves. Ensure that your mozzarella is well-drained to prevent excess moisture. Cut the mozzarella into bite-sized pieces, making them roughly the same size as your tomatoes.
- Assembly: Assembling a Caprese skewer is where the magic happens. Thread a tomato onto a skewer, followed by a folded basil leaf, and then a piece of mozzarella. Repeat this pattern until the skewer is filled, leaving a small space at the end for guests to easily handle the skewer.
- Finishing Touch: Once your skewers are assembled, drizzle them generously with balsamic glaze. This step not only enhances the taste but also adds an artistic flair, making the skewers look even more enticing.
Savory Cheese Wreath
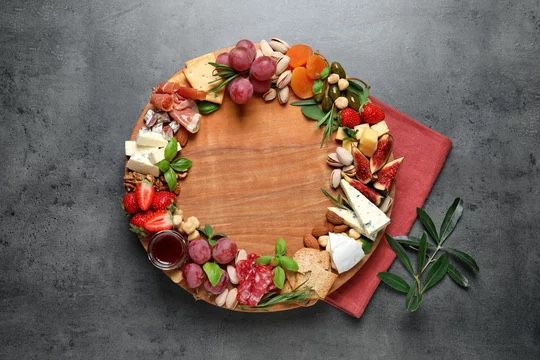
If you’re anything like me, the holiday season is all about spending quality time with loved ones, unwinding, and of course—the incredible food! As the designated chef of my friend group, I take my hosting duties seriously. One of my favorite go-to appetizers is the savory cheese wreath. Not only does it look insanely gorgeous sitting pretty on the buffet table, but dang is it delicious too.

Funnily enough, the origins of this festive appetizer are actually quite humble. Traditionally enjoyed in European villages, the wreath embodied the community spirit of bringing people together through sharing meals. While it may seem fancy these days, its heart has always been about fostering connection. And that sentiment is what I love most about cooking for others during the holidays.
the process
I’ll be honest—when I first tried making a cheese wreath, the process seemed so daunting and intricate. But once you get a handle on the basics, it really comes together like a breeze. I’ll walk you through the simple ingredients and assembly steps so you can feel confident giving it a whirl, even if you’re a total newbie in the kitchen like me. The best part is taking your time to let your creativity flow as you arrange all the yummy components.
But oh man, you should see the awestruck looks on everyone’s faces when they spot the cheese wreath in all its glory. The colors, scents and textures draw people in like a siren song. Even bigger than the “ooohs” and “aaahs” though, are the happy sighs of pure joy as the first bites hit taste buds. Combining different flavors and feels in each bite is pure sensory bliss.
When it comes down to it, the thing I cherish most about this holiday tradition is how it unites people through the simple act of sharing food. As we graze on the wreath together, meaningful connections are made. So whether you’re a gourmet chef or cooking rookie, I say give this one a try this season. Your guests are sure to be impressed—but more importantly, you’ll be feeding something even more priceless than any empty stomach.
The Ingredients:
- Assorted cheeses: You can use a variety of cheeses, such as cheddar, Swiss, brie, or gouda. Mix and match for a range of flavors and colors.
- Fresh rosemary sprigs: These serve as the ‘wreath.’
- Red grapes: These mimic the appearance of berries on the wreath.
- Crackers or breadsticks: For serving.
- Optional: Dried fruits, nuts, and honey for additional garnish.
The Preparation:
- Choose Your Cheese: Begin by selecting an assortment of cheeses. Soft, semi-soft, and hard cheeses work well together, providing different textures and flavors. Slice them into bite-sized pieces or cubes.
- Create the Base: Arrange the cheese cubes in a circular pattern on a large platter or serving board. Leave a gap in the center to mimic the ‘wreath’ shape.
- Decorate with Rosemary: Take fresh rosemary sprigs and tuck them into the gaps between the cheese cubes. These will serve as the ‘foliage’ of the wreath and infuse the cheese with a delightful aroma.
- Grapes as Berries: Place red grapes in clusters around the wreath, mimicking the appearance of berries. These not only add a pop of color but also provide a refreshing burst of sweetness that pairs wonderfully with the cheese.
- Additional Garnish: To further enhance the flavors and appearance, consider adding dried fruits, nuts, and a drizzle of honey. These ingredients can be strategically placed to complement the overall look and taste of the wreath.
- Serve with Crackers: To complete the presentation, surround the wreath with an assortment of crackers or breadsticks. These act as the ‘ribbons’ that tie the whole creation together.
Variations to Explore:
- Mediterranean Twist: Use Mediterranean cheeses like feta and halloumi, and add olives and sun-dried tomatoes for a Mediterranean-themed wreath.
- Herb and Garlic Infusion: Mix your cheese with herbs and roasted garlic for an aromatic wreath with a burst of savory goodness.
- Pesto Paradise: Incorporate pesto into your wreath by spreading it on some of the cheese cubes, adding a burst of vibrant green and basil flavor.
- Spice It Up: For those who enjoy a bit of heat, incorporate slices of spicy pepper jack cheese into your wreath and serve it with jalapeño slices.
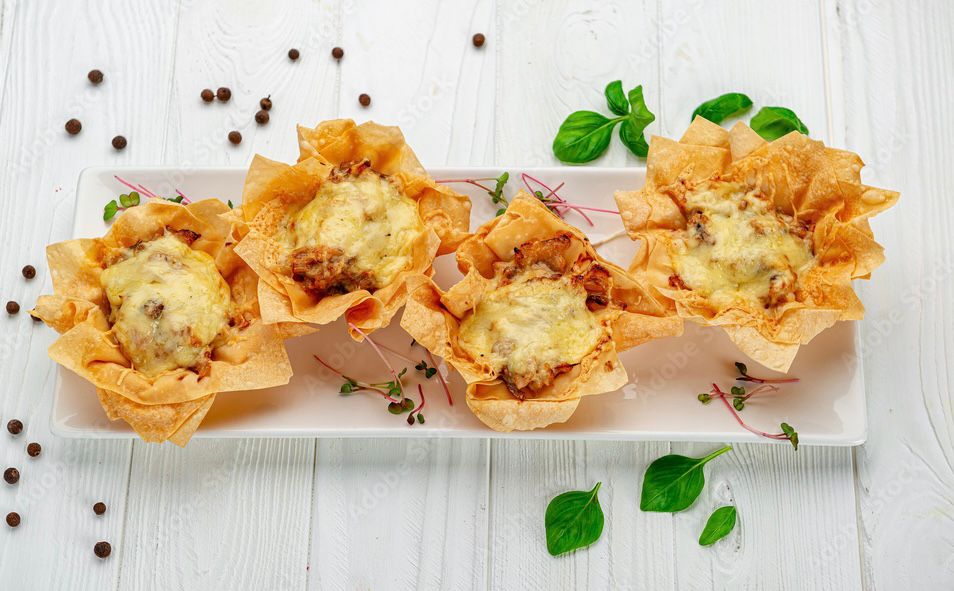
Mini Quiches – Christmas Appetizers

When it comes to wowing guests with appetizers, mini quiches are hands down one of my favorite things to serve. Don’t let their petite size fool you – these bite-sized beauties are packed with incredible flavor. Whether I’m cooking for close friends or hosting a fancy get-together, quiches never fail to impress.
I think what draws people to quiches is their elegant simplicity. The flaky crust and perfectly set filling just look so darn pretty. But more than that, they strike this perfect balance between rich and creamy that gets people coming back for more. Each bite is like taste bud heaven! Creating that balance is truly an art form.
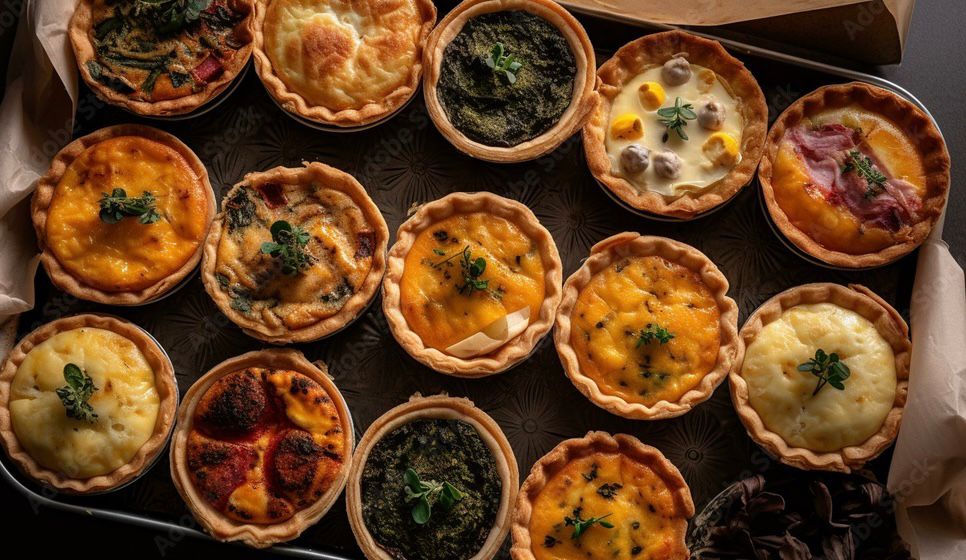
Of course, the craft starts with getting the crust and custard just right. For the crust, you really can’t beat a flaky, buttery pastry. Homemade is best in my opinion – you can just taste the extra love. As for the custard, it’s all about finding that sweet spot between runny and dense. The custard holds it all together so it needs to shine.
different fillings
Once you nail the basics, the real fun begins playing around with different fillings. I’m always mixing it up depending on the season, my mood, or who I’m cooking for. Seafood, veggie, meat – you name it, I’ve probably tried it. The options are endless! I especially love using whatever fresh ingredients I find at the farmer’s market. It’s so satisfying seeing people’s reactions when they sample my concoctions.
Whether served at a casual get-together or fancy dinner party, mini quiches always steal the show. No matter how many appetizers I put out, the quiches are always the first to go. They just have this magical quality that leaves people wanting more. So next time you’re hosting, I definitely recommend adding quiches to your menu. You won’t regret it!
The Filling: A World of Possibilities
One of the most exciting aspects of mini quiches is the limitless range of fillings you can experiment with. Let your culinary imagination run wild, and personalize your quiches to suit your taste and occasion.
1. Classic Lorraine:
- A timeless favorite, the classic Lorraine quiche is made with bacon and Swiss cheese. The smoky, savory notes of the bacon meld beautifully with the creamy custard, making each bite a delight.
2. Garden Fresh:
- For a burst of freshness, consider a garden-inspired quiche. Spinach, mushrooms, cherry tomatoes, and a medley of herbs offer a delightful contrast to the richness of the custard.
3. Mediterranean Delight:
- Take a culinary trip to the Mediterranean by incorporating feta cheese, kalamata olives, and sun-dried tomatoes into your quiche. The tangy flavors of this combination will transport your taste buds.
4. Smoked Salmon and Dill:
- Elevate your brunch game with a luxurious quiche featuring smoked salmon and fresh dill. This pairing brings a touch of indulgence to your table.
5. Sweet and Savory:
- Experiment with a touch of sweetness by adding caramelized onions and Gruyère cheese. The sweet and savory interplay is a culinary masterpiece.
6. Tex-Mex Fiesta:
- For those who love a bit of spice, a Tex-Mex-inspired quiche with chorizo, jalapeños, and cheddar cheese is the way to go. The heat of the jalapeños harmonizes wonderfully with the creamy custard.
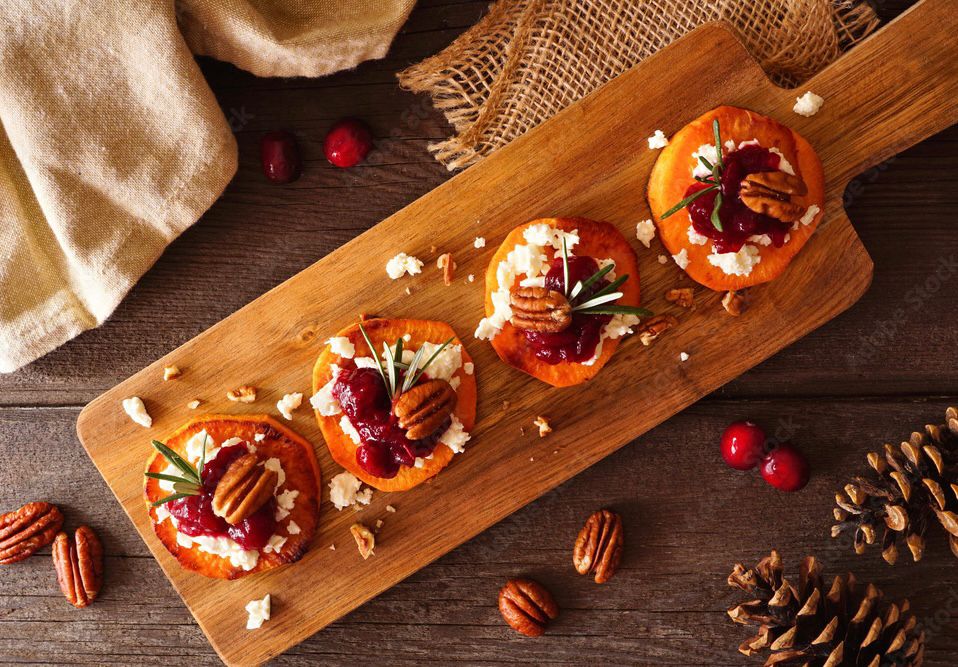
Spinach and Artichoke Dip -Christmas Appetizers

There’s nothing quite like digging into a warm bowl of creamy spinach and artichoke dip. This classic appetizer has a way of bringing folks together and putting everyone in a good mood. As I was reminiscing about family dinners past, it got me thinking about the surprising history and versatility of this crowd-pleasing dip. By the time you’re done reading, I hope you’ll be inspired to whip up a batch yourself. Let’s dive in!
The Origins: An Unexpected Success Story
Believe it or not, spinach and artichoke dip didn’t always have the popularity it enjoys today. The story goes that it first popped up on appetizer trays in the San Francisco area back in the 1980s. With its cheesy, herby blend of flavors, it didn’t take long for foodies up and down the coast to get hooked. Before we knew it, the rich and savory dip had spread nationwide. Who knew that throwing spinach, artichokes, and cream cheese together would result in such a lasting hit?
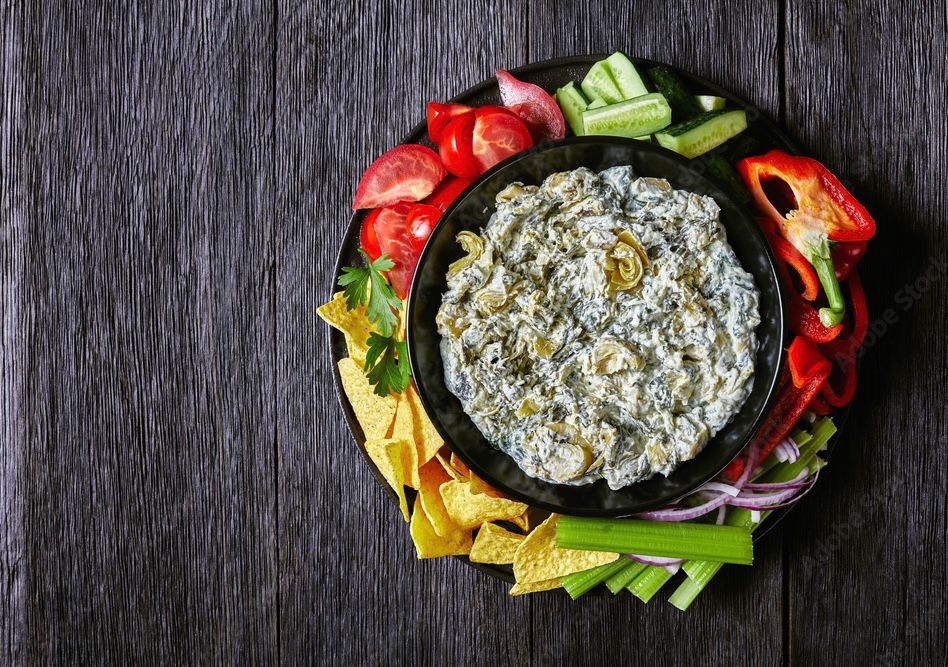
The Components: A Symphony for Your Taste Buds
Of course, great flavor is what keeps us coming back for more of this dip. Let’s take a moment to appreciate the magical ingredients: Earthy spinach and nutty artichoke hearts provide texture and intrigue in each bite. Creamy cheeses like ricotta and Parmesan melt together like a dream. A hint of garlic and a pinch of red pepper flakes add just the right amount of spicy complexity. It’s truly an orchestra of taste.
Beyond Dip: Get Creative in the Kitchen
While this dip shines on its own with crispy pita triangles or veggies, you can really have some fun with it in other dishes too. I like stuffing mushroom caps and baking them until golden brown. Or mixing it into pasta for an ultra creamy weeknight meal. Have you tried grilled cheese sandwiches with the dip piled high inside? Heaven! You can even use it as a unique pizza sauce. The possibilities are endless – I say we start experimenting.
The Secret Recipe Revealed
Alright friends, gather ’round because I’m about to share my prized spinach and artichoke dip recipe with you. Just follow the instructions and you’ll be wowing guests in no time. Don’t be surprised if you catch yourself sneaking tastes straight from the bowl!
In closing, this classic appetizer remains a comfort food staple for a reason. The blend of tastes never seem to get old. So when you’re craving something cozy and crowd-pleasing, you know what to make. Let’s raise a glass to spinach and artichoke dip – long may she reign!
The Ingredients:
- 1 cup frozen chopped spinach, thawed and drained
- 1 can (14 oz) artichoke hearts, drained and chopped
- 1 cup cream cheese
- 1/2 cup mayonnaise
- 1/2 cup sour cream
- 1 cup shredded mozzarella cheese
- 1/2 cup grated Parmesan cheese
- 3 cloves garlic, minced
- 1/2 teaspoon salt
- 1/4 teaspoon black pepper
- 1/4 teaspoon red pepper flakes (optional)
The Preparation:
- Preheat your oven to 375°F (190°C).
- In a medium-sized mixing bowl, combine the cream cheese, mayonnaise, sour cream, mozzarella cheese, and grated Parmesan cheese. Stir until the mixture is smooth and well blended.
- Add the chopped artichoke hearts, thawed and drained spinach, minced garlic, salt, black pepper, and red pepper flakes (if you desire a little heat). Mix all the ingredients until they are evenly distributed.
- Transfer the mixture to a baking dish. You can use a pie dish, a small casserole dish, or any oven-safe serving dish you prefer.
- Bake the dip in the preheated oven for about 25-30 minutes, or until it is hot and bubbly, and the top turns golden brown.
- Once your spinach and artichoke dip is ready, remove it from the oven and let it cool slightly before serving.
- This dip is best enjoyed when it’s warm. Serve it with tortilla chips, fresh bread slices, or an assortment of vegetable sticks.
Bacon-Wrapped Dates

My love affair with bacon-wrapped dates began several years ago at a holiday party. As I mingled with friends and family, munching on the usual array of appetizers, one morsel in particular caught my eye. Nestled on a bed of parchment paper were plump dates wrapped in paper-thin slices of bacon. Intrigued, I snagged one and took a bite. What unfolded in my mouth was nothing short of magic.
The date’s signature sweetness burst forth initially, coating my tongue. But that’s when things got interesting – as I chewed further, contrasting textures emerged with exquisite timing. A creamy center, whether it be cheese or nuts, swirled into the dance. And just when I thought it couldn’t get any better, the bacon stepped in to deliver its own brand of savory sizzle. Smoke kissed my palate in the most delightful of ways.

Needless to say, I was instantly smitten. Over the ensuing weeks, I found myself daydreaming about those bite-sized bundles of joy. The complex layers they hosted within each morsel was nothing short of inspired. I simply had to try recreating the magic for myself. And so began my ongoing love affair with all things bacon-wrapped and date-filled.
Experimenting in the kitchen proved the combination to be endlessly adaptable. Not content with standalone classics, I’ve stuffed dates with everything from cream cheese to almonds to crumbled blue cheese. The spicy versions layered with roasted jalapeños are a particular favorite of mine. Whether fingerfood or gourmet appetizer, the mouthwatering medley never fails to impress.
pairings
As for pairings, the options are truly unlimited. I find bacon-wrapped dates sing especially when offered alongside an ecclectic wine list or craft beers. Their salted-sweet dance holds its own against robust reds or craft brews alike. But simple pairings work too – I love having a date or two alongside my morning coffee for a savory start to the day.
In the end, what began as a casual canapé has evolved into a full-fledged culinary love story. Bacon-wrapped dates bring me back time and time again with their sophisticated melody of flavors and textures. It’s a melody I hope will sound sweet to your ears as well. Bon appétit!
The Ingredients:
- Bacon: The superstar of this dish, bacon, brings its salty, smoky, and crispy personality to the party. As it cooks, the bacon infuses the dates with its rich flavors while adding a satisfying crunch.
- Dates: Medjool dates, often called “nature’s candy,” are the sweet and chewy foundation of this dish. These jewel-like fruits provide a natural sweetness that pairs wonderfully with the bacon’s savoriness.
- Filling: The choice of filling is where creativity and personal preference come into play. You can opt for cream cheese, almonds, pecans, or even blue cheese. The filling introduces another layer of taste and texture, making each bite a surprise.
Preparation:
- Preparing the Dates: Begin by slicing the dates lengthwise to remove the pits. This creates a pocket for your chosen filling.
- Adding the Filling: Stuff the cavity in each date with your preferred filling. This step is crucial as it will influence the overall flavor profile.
- Wrapping in Bacon: Now comes the bacon. Cut the bacon slices in half and wrap each stuffed date with a piece of bacon, securing it with a toothpick.
- Cooking: Place the prepared dates on a baking sheet and pop them into the oven. As the bacon crisps and the dates caramelize, the kitchen will be filled with an irresistible aroma.
- Serving: Once they’re golden brown and sizzling, remove the dates from the oven and let them cool for a minute. The moment of truth has arrived, and you can serve these little bites of heaven to your eagerly awaiting guests
Puff Pastry Pinwheels
While stuffed mushrooms and bruschetta often steal the spotlight at parties, there is one appetizer that deserves far more praise – the puff pastry pinwheel. These delicate little spirals are not only crowd-pleasers but also surprisingly easy to make. So put on your comfiest sweater, pour a glass of wine, and let’s explore the wonderful world of puff pastry pinwheels.
What Exactly Are Puff Pastry Pinwheels?
At their simplest, puff pastry pinwheels are sheets of buttery puff pastry rolled up with various delicious fillings and baked until golden brown. The magic happens in the puff pastry itself. Through many folds and rolls, the pastry develops hundreds of thin, flaky layers that puff up dramatically in the oven. Each bite provides a delightful crunch along with an incredibly satisfying richness from all that butter. It’s pure bliss for your taste buds!
Getting Creative With Fillings
Once you’ve mastered the art of puff pastry, the real fun begins by dreaming up creative fillings. The possibilities are endless – you can’t go wrong with classics like spinach and feta or caramelized onions and goat cheese. Feeling adventurous? Try pumpkin sage pesto or artichoke hearts with sundried tomatoes. Catering to picky eaters? Mini turkey wraps or ham and Swiss roll-ups save the day. And just when you think you’ve tried every combination, a new delicious idea will strike!
Perfect for Any Occasion
Whether you’re hosting an casual movie night, holiday party, or fancy soiree, puff pastry pinwheels are guaranteed to impress. Their elegantly presented spirals look like they came from a gourmet bakery while also being totally stress-free to make. With their endless flavor adaptations, there’s a pinwheel to suit every taste. So pull out your rolling pin and apron, and enter the delightful world of these unsung appetizer heroes. Your guests will thank you!
Ingredients:
- 1 sheet of puff pastry (store-bought or homemade)
- 1/4 cup of your favorite filling (e.g., pesto, sun-dried tomatoes, and feta cheese)
- 1 egg (for egg wash, optional)
- Sesame seeds or poppy seeds for garnish (optional)
Preparation:
- Thaw the Puff Pastry: If you’re using frozen puff pastry, make sure to follow the package instructions for thawing. Homemade puff pastry can be used immediately.
- Roll Out the Pastry: Roll out the puff pastry sheet on a lightly floured surface to a rectangle of about 12×10 inches.
- Add the Filling: Spread your chosen filling evenly over the puff pastry sheet, leaving a small border around the edges.
- Roll It Up: Starting from the long edge, tightly roll the pastry sheet, enclosing the filling. You’ll end up with a log.
- Chill the Log: Place the log in the refrigerator for about 20-30 minutes to firm it up, making it easier to slice.
- Preheat the Oven: Preheat your oven to 375°F (190°C) while the log is chilling.
- Slice into Pinwheels: Once chilled, remove the log from the refrigerator. With a sharp knife, slice the log into rounds, about 1/2 to 3/4 inches thick.
- Arrange on Baking Sheet: Place the pinwheels on a baking sheet lined with parchment paper. If you prefer a glossy finish, brush the tops with an egg wash. Sprinkle sesame seeds or poppy seeds for added texture and flavor.
- Bake to Perfection: Bake in the preheated oven for 15-20 minutes or until the pinwheels are golden brown and puffed up.
- Serve and Enjoy: Let your pinwheels cool for a few minutes before serving. They are best enjoyed warm, though they can be served at room temperature as well.
Variations and Creative Fillings
The true beauty of puff pastry pinwheels lies in their adaptability. You can fill them with an array of ingredients to suit your taste and the occasion. Here are some creative variations to consider:
- Spinach and Feta: A classic combination, sautéed spinach and crumbled feta cheese create a savory, earthy flavor profile.
- Bacon and Cheddar: For a touch of indulgence, mix crispy bacon bits and shredded cheddar cheese. The smokiness of the bacon complements the richness of the cheddar.
- Mediterranean Delight: Spread a layer of hummus, then top with diced tomatoes, cucumbers, olives, and crumbled feta cheese for a taste of the Mediterranean.
- Pesto and Sun-Dried Tomato: Pesto adds a burst of herbaceous freshness, while sun-dried tomatoes bring a sweet, concentrated tomato flavor. Sprinkle some grated Parmesan on top for an extra layer of richness.
- Sausage and Caramelized Onions: Sautéed sausage crumbles and caramelized onions lend a hearty, savory depth to your pinwheels…